1 - Configure the API connection to your PSA
In this guide, you'll learn how to configure the API details in Sync 365 to connect to your PSA.
In Sync 365 Click Tools> Integration Settings
Select your PSA system below to get started.
Connectwise Manage
Connectwise Manage
Step 1: Prerequisites
Ensure you have admin or user management permissions in ConnectWise Manage.
If you self-host ConnectWise and restrict IP addresses or geolocations, make sure to whitelist all IP addresses that Sync 365 may use. IP Addresses to Whitelist
You may either create API keys on an existing user, or you can create a specific API Member account. We recommend using an API member account for tracking and auditing purpose so we will document the process of using a new API user.
Step 2: Creating a New API Member
- Log in to ConnectWise Manage.
Navigate to System> Members.
Click on the API Members tab.
Create a new API Member with the following details:
Member ID: S365
Member Name: Sync 365

Role ID: Use "Admin" for simplicity, or create a custom security role with the following permissions:
- Custom Role: or you can create a security role with the following access in system> Security roles:
- Set the security role permissions as follows
Header Item Access Level Companies Company Maintenance Inquire - All Companies Contacts Add/Edit/Enquire - All Finance Agreement Invoicing Inquire - All Finance Agreements Add/Edit/Inquire - All Finance Invoicing Inquire - All Procurement Product Catalog Inquire - All Procurement Products Inquire - All Service Desk (for notifications) Service Tickets Add/Inquire - All System Table Setup Edit/Inquire - All - Note on Finance - Agreements: If you restrict the agreement types that are allowed access, ensure that any potential parent agreement type is also included.
- Note on System Table Setup: You must ensure that these options are selected as a minimum if you are going to restrict access: Agreements/Agreement Type, Agreements/Batch, Contacts/Contact Type, Service/Priority, Service/Service Board, Service/SLA

- Under API Members, set the Department to Admin (or another department without restrictions).
Set your Location as required.
Save the API member.
Navigate to the API Keys tab and click + to create a new API key.
Provide a description (e.g., "S365") and click Save.
Note down the public and private keys. You won't be able to access the private key again after saving it.
Step 3: Adding ConnectWise to Sync 365 License
- Log in to Sync 365 License athttps://sync.s365l.com
- Click on Tools> Integration Settings

- Click the + next to PSA Tools
- Select Connectwise as the PSA Type
- Enter in your company ID
Enter the ConnectWise URL:
For Australia:
api-aus.myconnectwise.netFor Europe:
api-eu.myconnectwise.netFor North America:
api-na.myconnectwise.netFor self-hosted ConnectWise: Use your self-hosted URL.
- Enter the public and private keys obtained from ConnectWise Manage.

- Click test and save
- The platform will verify the details and retrieve your customers, agreements, and products.
Autotask PSA
Autotask PSA
Step 1: Creating an API User
- Follow the Autotask instructions for –Adding or editing an API user (autotask.net)
- Navigation: Autotask menu>Admin>Account Settings& Users>Resources/Users (HR)>Resources/Users>New>New API User.

- Navigation: Autotask menu>Admin>Account Settings& Users>Resources/Users (HR)>Resources/Users>New>New API User.
- Ensure you select Sync 365 License from the Integration Vendor dropdown

- Assign a default system API level to the API user.
- If you need additional security, ensure the user has the following permissions:
- Navigation: Autotask menu>Admin>Account Settings& Users>Resources/Users (HR)>Security> Security Levels
Header Item Permissions Contracts Contracts View - All, Add - Yes Contracts Can modify Service/Bundle on contract charges Selected Contracts Contract Visibility Full CRM Customer& Cancellations All CRM Accounts Add - Yes, Edit - Yes CRM Contacts Add - Yes Inventory Items View - All Inventory Products View - All Inventory Product notes edit Add - Yes, Edit - All Admin Accounts& Contacts Selected Admin Products, Services& Inventory Selected Admin Contracts& Un-Posting Selected Service Desk Tickets View - All, Add/edit - Yes Web Services API Can login to Web Services API Selected
- Generate aKey andSecret
- Record these details to enter later
Step 2: Adding Autotask to Sync 365 License
- Log in to the Sync 365 portal atsync.s365l.com
- Click on Tools> Integration Settings

- Click the + next to PSA Tools
- Select Autotask as the PSA Type
- Enter the Username and Secret for the API user.
- Click Test and Save Credentials
- The platform will verify the connection and then retrieve the latest data from Autotask.
HaloPSA
HaloPSA
Note: Halo is currently supported for automated azure billing only.
Step 1: Creating an API User
- Open Configuration > Teams & Agents > Agents
- Create a new Agent to use with the API
- Suggested settings:
- Username: Sync365
- Roles: Administrator
- Tick Account active
- Tick Is an API-only Agent
- Save the user
- Open Configuration > Integrations > HaloPSA API
- Note the url in Resource Server
- Note the "tenant" as well
- Click View Applications
- Create a New application
- Name: Sync 365
- Authentication Method: Client ID and Secret
- Login type: Agent
- Select the Agent you previously created (Sync 365)
- Copy the Client Secret
- Click the "Permissions" tab
- We need the following permissions (Or use "all")
- read: customers
- read and edit: contracts
- read: items
- read and edit: quotes
- read and edit: sos
- read and edit: invoices
- read and edit: softwarelicensing
- read and edit: software
- Click save to create the app
Step 2: Adding Autotask to Sync 365 License
- Log in to the Sync 365 portal at sync.s365l.com
- Click on Tools> Integration Settings
- Click the + next to PSA Tools
- Select Halo as the PSA Type
Enter the tenant:
Enter your resource URL (we will remove https etc if it is entered)
- Enter the ClientID and Secret for the API application.
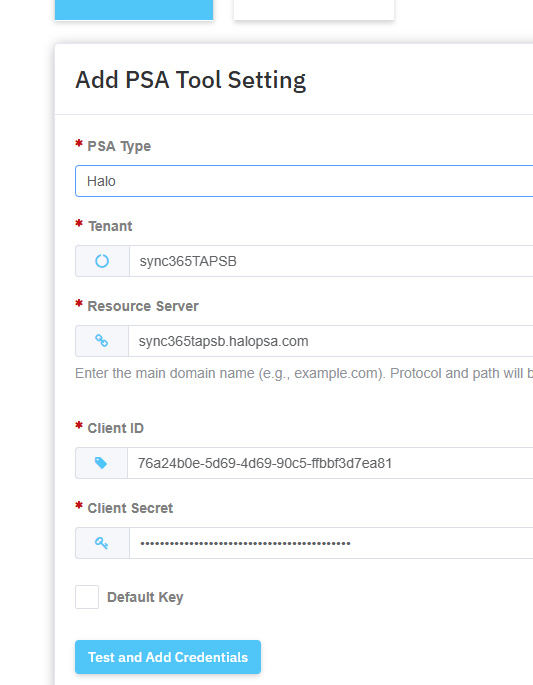
- Click Test and Add Credentials
- The platform will verify the connection and then retrieve the latest data from Halo.
Enter the tenant:
Enter your resource URL (we will remove https etc if it is entered)
Follow these instructions carefully to ensure a smooth setup of your PSA integration with Sync 365.
If you encounter any issues, double-check your permissions or contact support (support@sync365license.com) for further assistance.
Continue to the next page after successfully adding your PSA.
Continue to configure your Microsoft Partner Account
Related Articles
Getting Started Overview
Welcome to Sync 365! We're thrilled to have you join us. Sync 365 was created to save you time, keep your customer agreements up to date, and simplify your daily operations. Once you set up and connect your customer licenses to your PSA (Professional ...5 - Link your customer Microsoft 365 Licenses to PSA Agreements
You are now ready to start mapping your customer Microsoft 365 Licenses to their relevant products and the customer agreements in your PSA. Please note that Monthly and Annual agreement terms in your PSA are currently supported. After this, your ...2 - Configure Microsoft 365 partner admin account
To access your tenant list and license details, you need to connect Sync 365 to your Microsoft Partner Center. We recommend creating a specific account (e.g.,S365@<yourtenant>) with Admin Agent permissions to your customer accounts. If you use custom ...3 - Configure billing profiles
Billing profiles are the backbone of Sync 365 (S365). They allow you to specify the product used so we can add/update the correct product on the agreement/contract. Essentially, billing profiles automate the billing of Microsoft 365 license types or ...Trial Checklist
As you are working through your trial and discovering how Sync 365 can save you time, increase your recurring revenue and make your life easier, here is a checklist to make the most out of Sync 365 and have the largest positive impact in your ...